[Gradle] Writing custom plugin in Gradle (part 1)
Problem
Gradle is powerful build automation tool. It has a lot things out of the box. However, almost for sure, we will need customizations some day. Writing custom tasks in build.gradle can solve problem for short time, but the more custom tasks written, the more build.gradle will be unreadable. Luckily, gradle allows us to implement own plugin using groovy and java.
This post contains of three parts. In the first one, we will look at:
- writing plugin basics
- attaching it to buildscript
As a case study, in part 3, sample mail plugin will be implemented. It will inform about build status via email.
All examples from this post are available at github: https://github.com/sebitgtutorials/gradle-plugin
Step1 - Gradle plugin basics
In step1, we will take a look at plugin project structure and simple task implementation. At the end, we’ll install our jar in maven local, and test it on sample project for tools/gradle-plugin-test dir, in our tutorial examples repository.
The first example is available at branch step1 in our tutorial repository. To get it, we need to checkout:
git checkout -b step1 origin/step1
First of all, let’s take a look at project structure:
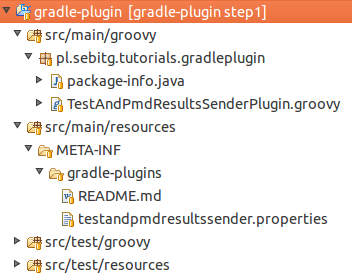
Typical way of naming plugin class is: MY_PLUGIN_NAME + Plugin. In our case, it would be TestAndPmdResultsSenderPlugin The most important thing is to point our plugin class in jar’s manifest. In this case, file named testandpmdresultssender.properties was created in META-INF/gradle-plugins dir. It should contain the following content:
implementation-class=pl.sebitg.tutorials.gradleplugin.TestAndPmdResultsSenderPlugin
Our plugin class is not complicated. It’s should implement Plugin<T> interface, where T param is org.gradle.api.Project class. As a basic example, we create task called someTask, and use println to write Hello world message.
package pl.sebitg.tutorials.gradleplugin

import org.gradle.api.Plugin
import org.gradle.api.Project

/**
 * Gradle plugin main class
 * @author Sebastian Mekal <sebitg@gmail.com>
 */
class TestAndPmdResultsSenderPlugin implements Plugin<Project> {

	@Override
	public void apply(Project arg0) {

		arg0.task('someTask') << {
			println "Hello someTask world!"
		}

	}

}
Let’s test it. We type:
gradle build installRight after that, we take a look at tools/gradle-plugin-test on tutorials repository. It’s our test project. We configure build.gradle in the following way:
buildscript {
    repositories {
	mavenCentral()
	mavenLocal()
    }

    dependencies {
        classpath 'pl.sebitg:gradleplugin:0.1.+'
    }
}

apply plugin: 'java'
apply plugin: 'testandpmdresultssender'

repositories {
    mavenCentral()
    mavenLocal()
}

dependencies {
}
The most important part of this file is buildscript section:
- It’s dedicated place for custom plugins declarations.
- Our plugin is placed in mavenLocal() repository, that’s why we point it in
repositoriessection of build script. - We declare our plugin in
dependenciessection. The group ispl.sebitg, and the artifact name isgradleplugin, with version 0.1.+.
The last thing is to apply our plugin in project. We do it by line:
apply plugin: 'testandpmdresultssender'Let’s test it. As we know, the name of our task is someTask. We execute it with the command and wait for result:
gradle someTask
Voila! It’s working. Hello world message is displayed.
This was the first part of tutorial. In the second part, we will face with plugin extension and custom task implementation. In the third part, we will prepare case study application: mail sender plugin.